Smooth Panel Glide Blinds Sunshine Coast
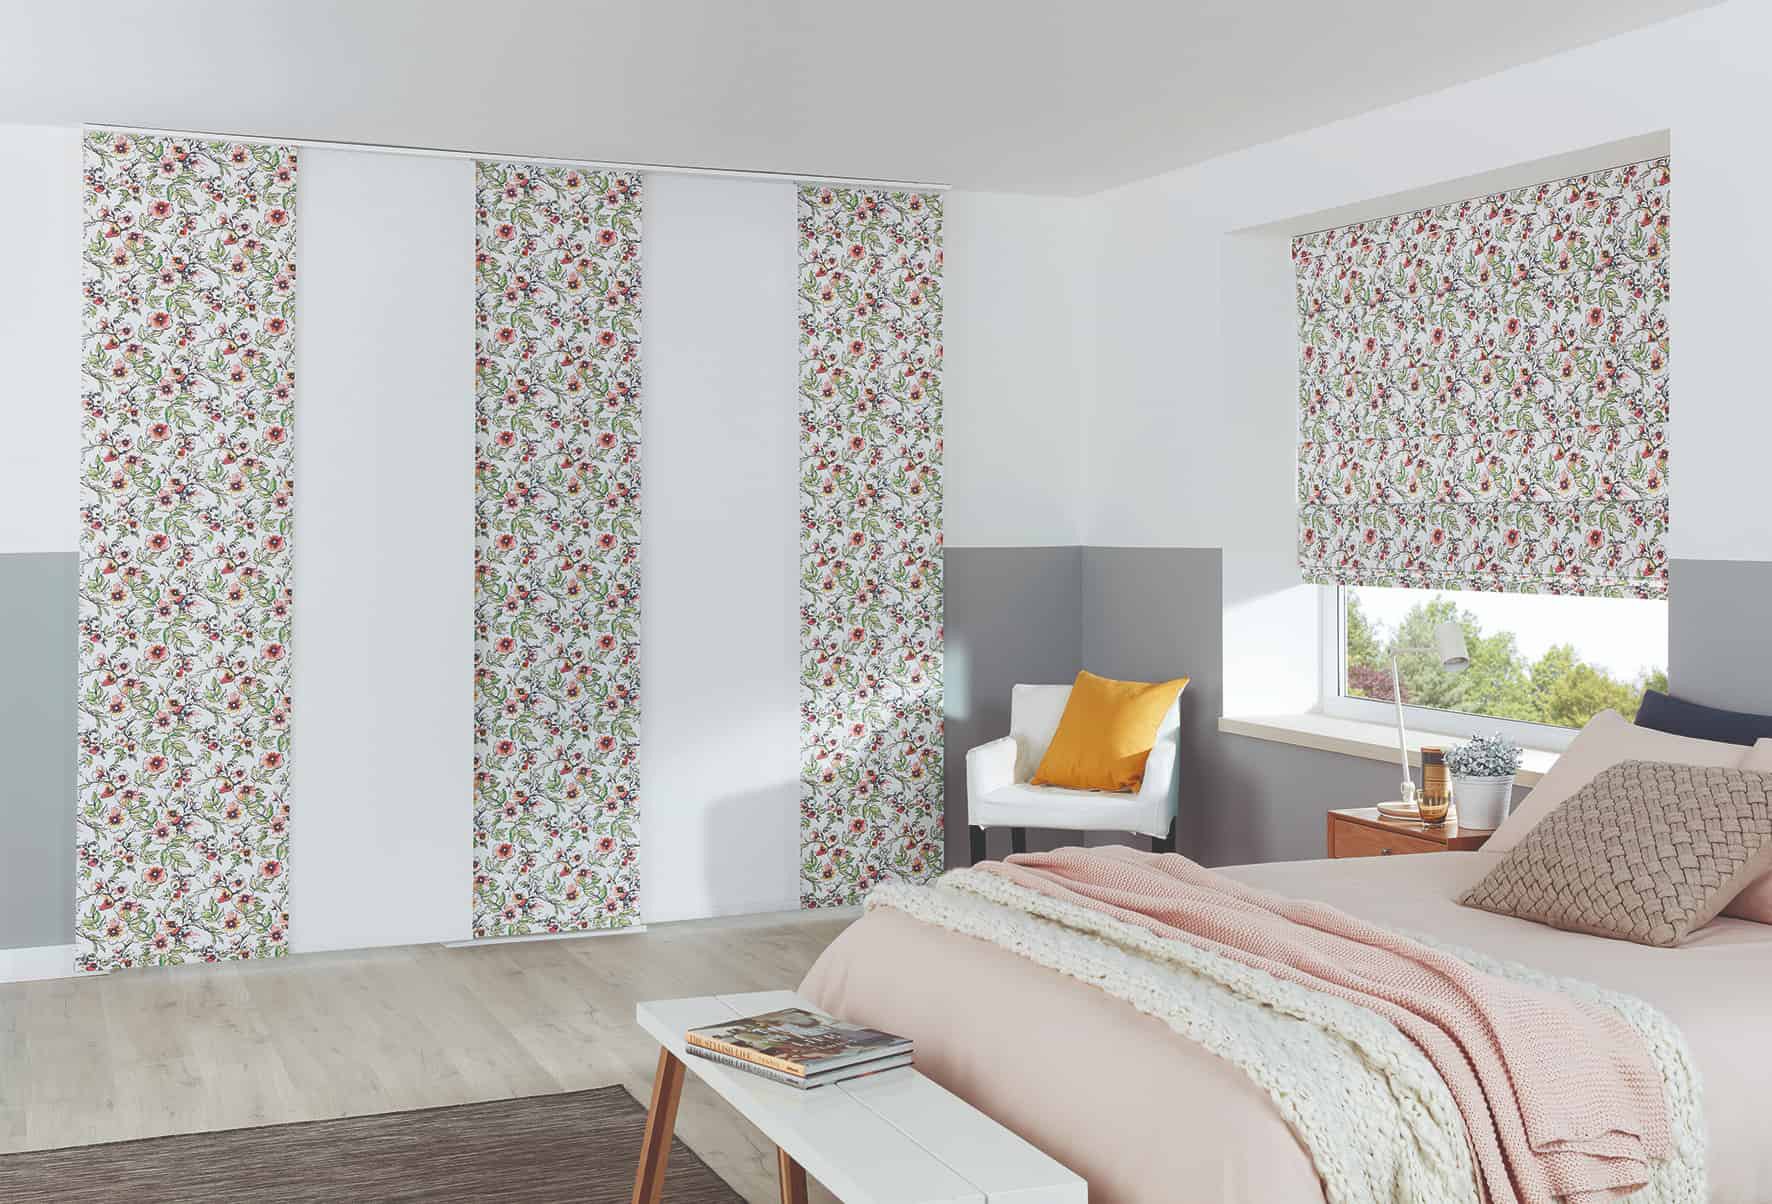
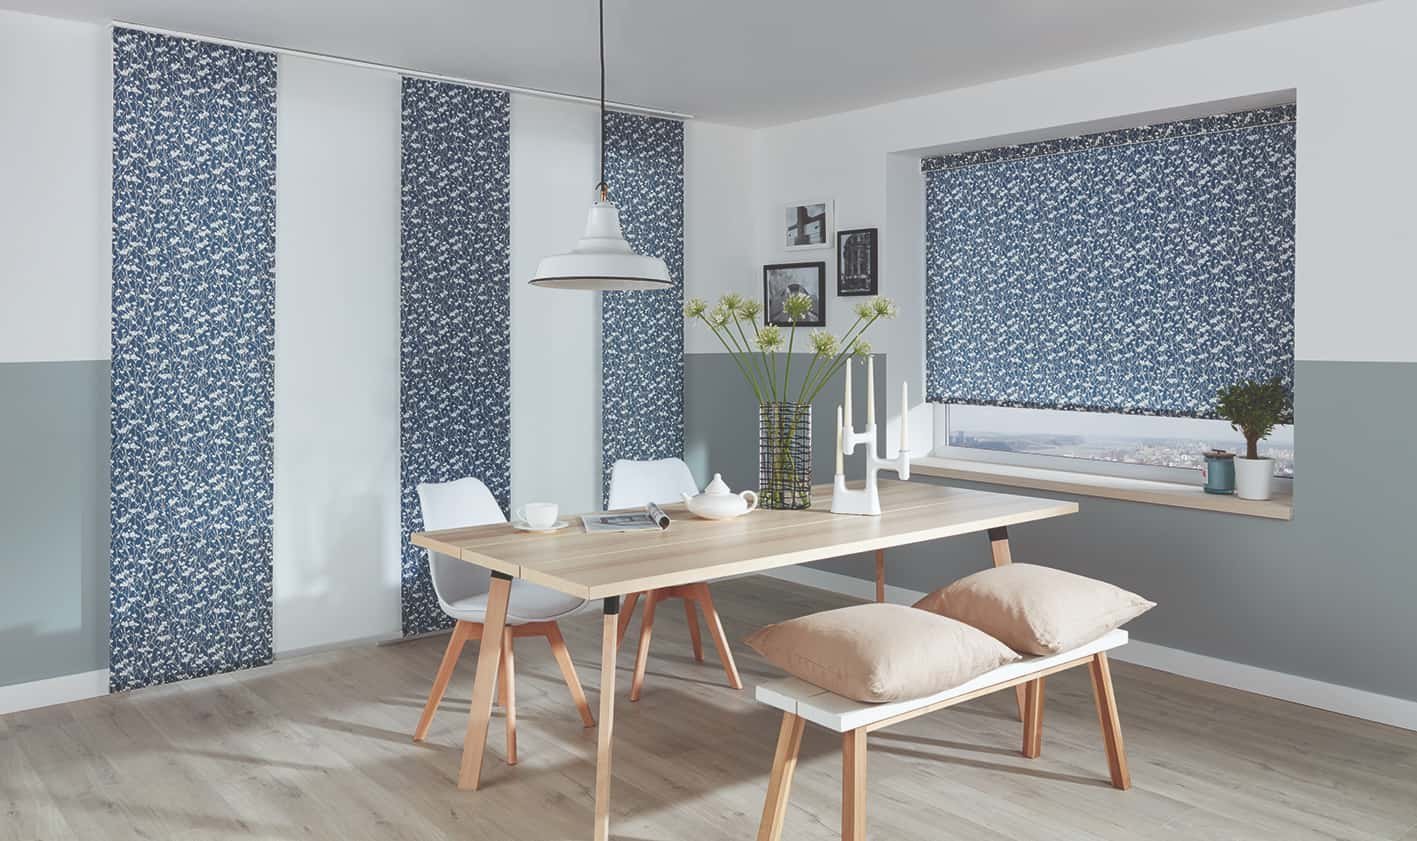
Panel Glide Blinds Perfect for Wide Open Spaces
The Coverings Panel Glide Blinds are handcrafted for a smooth and effortless operation, with wand control and versatile track layout options for two to seven panels and four stacking options: left, right, centre or split.
They are the ideal choice for bi-fold doors, sliding doors or large glazed areas. With elegance and style, our Panel Glide Blinds can even work as room dividers for your wide spaces.
Are you looking for an option to block summer sunlight and heat whilst retaining warmth inside the home in winter? Check out our honeycomb blinds.

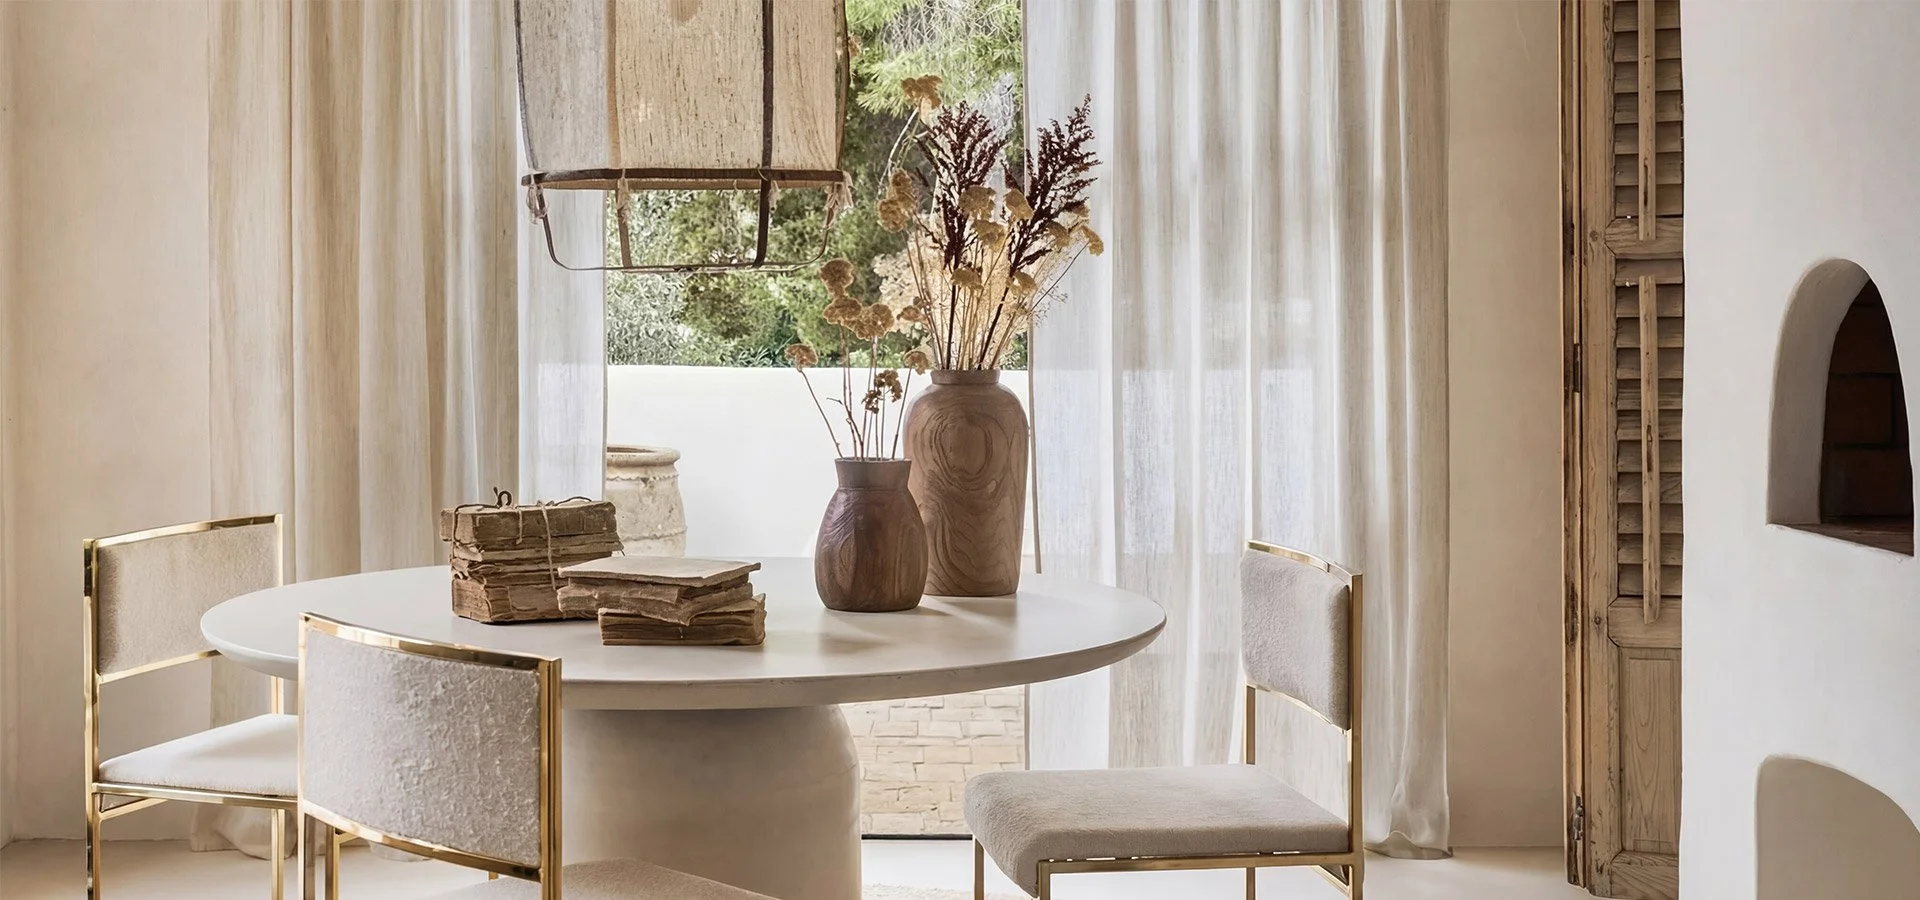
Harmonised look to your space
Panel Glide Blinds can match your Roman or Roller blinds, complementing and harmonising your interior.

Choose battens for simple elegance
Choose between Classic, Mode or Plantation Battens.
Features
Wand Control
Available with or without Battens
Recommended Panel Widths: 450mm to 900mm
Pelmets: 90mm and 160mm Fabric, Linea and Woodlook
Frequently Asked Questions About Panel Glide Blinds on the Sunshine Coast
-
Panel glide blinds are designed to provide privacy, and light control, and enhance the aesthetics of a space. Panel glide blinds consist of large fabric panels that glide along a track system, allowing you to easily slide them open or closed.
The panels of these blinds are typically made from a variety of fabrics, including sunscreen fabrics, light-filtering fabrics, and blackout fabrics. Sunscreen fabrics allow diffused light to enter while providing privacy and reducing glare. Light-filtering fabrics offer privacy while allowing some natural light to pass through, and blackout fabrics are designed to completely block light and provide maximum privacy.
Panel glide blinds are versatile and can be used for various window sizes and shapes, including sliding doors, large windows, and even as room dividers. They are available in a range of colours, patterns, and textures, allowing you to choose a style that complements your interior decor.
-
To measure for panel glide blinds, follow these steps:
Step One: Width Measurement
Measure the width of the window or area where you want to install the blinds.
If you have an existing window frame, measure the width from the outer edge of the frame on one side to the outer edge on the other side.
If you want the blinds to extend beyond the window frame, measure the desired width of the blinds accordingly.
Step Two: Height Measurement
Measure the height of the window or the area where you want to install the blinds.
Again, if you have an existing window frame, measure the height from the top edge of the frame to the bottom edge.
If you want the blinds to extend beyond the window frame, measure the desired height accordingly.
Step Three: Considerations
If you have an obstruction such as window handles or locks, make sure to measure the height and width taking them into account.
If you plan to mount the blinds outside the window frame, ensure that you have enough space and consider the desired overlap on each side.
Step Four: Repeat Measurements
It's essential to measure the width and height of the window or area in multiple places to account for any variations. Take the smallest measurements to ensure the blinds will fit properly.
Step Five: Seek Professional Assistance
If you're unsure about taking accurate measurements or have complex window configurations, consider consulting a professional window treatment specialist. They can assist you in measuring and guiding you through the process.
-
Panel glide blinds operate on a simple and efficient track system. Here's how they work:
Track System: Panel glide blinds consist of a horizontal track system that is typically installed at the top of the window or desired area. The track can be made of aluminium or another durable material.
Fabric Panels: The blinds feature individual fabric panels that hang vertically from the track. These panels can vary in width, depending on the size and design of the blinds.
Glide Mechanism: Each fabric panel is equipped with a specialised glider mechanism. These gliders allow the panels to smoothly slide along the track, enabling easy opening and closing of the blinds.
Control Options: Panel glide blinds can be operated using different control options, depending on your preference. Common methods include a wand or cord control system. With a wand control, you use a wand to push or pull the blinds, while cord control involves pulling a cord to move the panels.
Opening and Closing: To open the blinds, simply push the leading panel towards the opposite end of the track, causing the remaining panels to follow and stack neatly to one side. To close the blinds, slide the leading panel back to its original position, and the other panels will align accordingly.
Light and Privacy Control: Panel glide blinds provide excellent light control and privacy. When the panels are closed, they create a barrier, blocking light from entering the room and ensuring privacy. You can also partially open the blinds to allow light to filter through or slide them completely open to enjoy an unobstructed view.
Versatility: Panel glide blinds are not limited to windows alone. They can also be used as room dividers or to cover large openings, such as sliding doors or expansive glass walls. In such cases, the blinds are designed with wider fabric panels to accommodate the larger space.
-
Installing panel glide blinds typically involves the following steps:
Step One - Gather the Necessary Tools: Ensure you have the required tools for installation, including a tape measure, pencil, level, drill, screws, and a screwdriver or drill bit suitable for the screws.
Step Two - Measure and Mark: Measure the width and height of the window or area where you plan to install the blinds. Use a pencil to mark the positions for the track brackets on the wall or ceiling. Ensure the marks are level and aligned properly.
Step Three - Install the Track Brackets: Attach the track brackets to the marked positions using screws and a drill. Make sure the brackets are securely fixed to provide proper support for the track. Use a level to ensure the brackets are straight and even.
Step Four - Mount the Track: Place the track onto the installed brackets and secure it in place. Some tracks may require sliding or snapping onto the brackets, while others may need to be screwed into place. Refer to the specific instructions provided with your blinds for the correct installation method.
Step Five - Install Panel Clips: Panel glide blinds usually come with panel clips or carriers that attach to the fabric panels. These clips fit into the track and allow the panels to slide smoothly. Attach the panel clips to the panels according to the manufacturer's instructions.
Step Six - Hang the Panels: Insert the panel clips into the track, ensuring they are properly aligned. Test the panels to ensure they glide smoothly along the track. Adjust the clips if necessary to achieve the desired positioning and functionality.
Step Seven - Test and Adjust: Once all the panels are hung, test the blinds to ensure they open, close, and glide smoothly. Make any necessary adjustments to the panel clips or track brackets for optimal operation.
Step Eight - Finishing Touches: Trim any excess length from the panel clips if needed. Clean the blinds and remove any packaging materials or protective coverings.
-
The width of each panel in panel glide blinds can vary depending on several factors, including the specific brand, style, and customisation options. However, as a general guideline, the width of each panel in panel blinds typically ranges from around 16 inches (40 cm) to 36 inches (90 cm).
It's important to note that wider windows or larger areas may require wider panels to ensure proper coverage and functionality. Additionally, custom-made panel glide blinds can be tailored to your specific requirements, allowing for greater flexibility in panel width.
Major Brand Suppliers


Why Choose Us

25 Years of Experience

Up to 25 Year Product Warranty

Free Quote & Measure

Australian Made Products

Free Colour Consultation

Custom Design
Client love notes
-
“We are so thrilled with our window coverings. It is so hard to think that it has been a year since we moved in.”
Jan and Jim Christian
-
“Coverings Noosaville have taken their business to a new level. Its a fantastic experience to visit their showroom. Most Coverings Showrooms look like they have come from the mid century and are typically bleak and unimaginative. The products displayed are very appealing. Systems are app driven and sleek. Messaging and a smooth process is top class. Rate the team very highly“
Cheryl Nash
-
“Fantastic local company. Very prompt from quoting to installation. Excellent customer service and a very high quality product. Would 100% recommend using Coverings Sunshine Coast.“
Merrick Davis